Advertisement [ ? ]
Site Links
- Lease Calculator
- Advertise
- My Car ongoing Review
- Members' Chat
- Cars For Sale
- Car Dealers
- Honda "Fit" Manual
- Hyperflex Bushings
- For Sale
- Fix your Car
- Car Manuals
- other manuals - Reference Materials
- DIY Repairs
- Articles
- Video
- Link with Us
- Search Help
- Code your Mac!
- Fly, race, anything R/C
Troubleshoot Rack and Pinion Steering
Rack & pinion steering has been around for quite awhile and remains the most common type of steering system in todays cars and minivans. It is even showing up on some trucks and SUVs. Most are pretty durable and last upwards of 100,000 miles. But, sooner or later, all racks succumb to leaks or wear.
Common problems that afflict power racks are contamination, "morning sickness" and center wear. Contamination can occur if the power steering pump is failing, if the hoses are deteriorating, or if the fluid is contaminated by moisture or other substances. Morning sickness is a condition where the steering feels stiff when the car is first started on a cold morning. Normal power assist does not return until the car is driven awhile and warms up. This problem is most common in Saginaw racks on older General Motors FWD cars and is caused by wear in the spool valve housing. Center wear is caused by wear between the rack and pinion gears, and can allow steering wander when driving straight ahead.
Power racks can also develop fluid leaks. Seal wear can allow fluid to seep out of the power cylinder into the end bellows on the rack. The bellows are not designed to hold power steering fluid. The presence of power steering fluid in either bellow, therefore, means the rack is leaking internally and needs to be replaced. If nothing is done about the problem, the bellows will continue to mushroom with fluid until one or the other bursts, releasing the fluid that has been mysteriously disappearing from the pump reservoir.
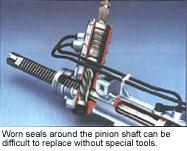
Fluid leaks around the pinion input shaft are also an indication of internal leakage that needs to be repaired. Though seal kits are available for many applications, installing seals is a delicate art that requires numerous special tools, and is not always successful. That is why most technicians simply replace he rack with a new or remanufactured unit.
The appearance and condition of the power steering fluid in the pump reservoir can reveal a great deal about the condition of a rack. Dark fluid indicates oxidation or contamination from dirt or metallic debris. A low fluid level usually means there is a leak somewhere in the system.
Other problems that can afflict racks include loose or torn bellows (boots), worn inner tie rod sockets, worn outer tie rod ends, and loose or broken rack mounts. Damaged bellows should always be replaced because they protect the inner tie rod sockets from road splash and contamination. Worn inner tie rod sockets and outer tie rod ends will cause steering looseness and toe wear on the front tires, and can be replaced separately if necessary. Loose or broken rack mounts can cause steering wander and noise. Rubber bushings can be replaced if worn or damaged, but broken or cracked mounting ears require rack replacement.
STEERING RACK DIAGNOSIS
Any time a steering problem is suspected, you should test drive the vehicle to confirm the complaint. Before leaving the service bay, make sure the vehicle can be safely driven. Also inspect the power steering hoses, fittings and drive belt, and the fluid level in the pump reservoir to rule out obvious problems.

A good way to inspect the steering linkage is to do a "dry park" check. This test involves rocking the steering back and forth with the full weight of the vehicle on the wheels (use a ramp type lift). By loading the rack and steering linkage this way, any play in the system becomes quickly obvious.
Start the dry park check by leaving the steering column unlocked and reaching up and rocking the steering input shaft from underneath the vehicle. Or, have a helper rock the steering wheel from inside the car while you observe the following points for play:
There are four basic types of rack mounts: the "spike" mount, the "cradle" mount, a cradle mount with a "puzzle lock" and a cradle mount with a locking tab. The spike mount is a simple rubber tube with a metal sleeve inside through which a bolt passes to mount the rack to the crossmember or firewall. The rack may have two or three such mounts holding it in place. Deterioration of the rubber insulator around the sleeve due to heat, age or oil contamination can allow the rack to wobble slightly on its mounts creating looseness in the steering or increased feedback through the steering wheel.
TEST DRIVE
If everything passes a visual test, take the vehicle on the road and see how it steers. Does the steering pull to either side? Is the amount of steering effort normal and the same in both directions? Is there any play or looseness in the steering wheel? Do the wheels re-center after turning? Any unusual noises?
If you find the steering pulls to one side while driving the vehicle, it might be due to an alignment problem or it might be due to a leaky spool valve that is routing pressure to one side of the rack.
If the steering feels stiff and requires a lot of effort, the rack piston seal may be leaking pressure or the pump may not be producing adequate pressure.
Normal operating pressures within a power rack generally do not exceed 150 psi when the wheels are straight ahead. In an easy turn, pressure can increase to 300 psi, and up to 700 psi in a tight turn. The highest pressures are usually encountered when parking. If the wheels are up against a curb or if the steering wheel is turned hard against the stop, it can climb to 700 to 2,000 psi depending on the application.
In vehicles that have "variable assist" power rack & pinion steering, maximum assist should be provided at low speed and taper off as the speed increases. If the control valve that shunts pressure sticks open, the rack may not have much assist at low speed.
Steering looseness and wander, when accompanied by a feathered toe wear pattern on the front tires, usually indicates worn inner sockets and/or outer tie rod ends that need replacing.
If the steering is slow to return or "sticks" when turning to either side, it may indicate binding or corrosion in the flexible coupling in the steering input shaft, or rusted or worn upper MacPherson strut mounts.
Steering wander and looseness can be caused by play in the rack, rack mounts or steering linkage (worn tie rod ends or sockets). The dry park check we described earlier should help you isolate the cause of the looseness.
STEERING RACK REPAIRS
OK, you have found a leaky or worn rack. Now what? You can attempt to rebuild it, or you can do what most sane people do and replace it with a new or remanufactured unit. Rebuilding racks is not for the faint of heart. It takes special tools and know-how, and leaves you vulnerable to comebacks should the rack you rebuilt turn out to be a leaker. Most manufacturers and rebuilders thoroughly test their racks before they are shipped to make sure they are leak free and operate properly. And they give you a warranty, which is something you do not get when you rebuild a rack yourself.
Replacement racks come in two basic varieties: long and short. Long racks come completely assembled and ready to install with new inner tie rods, bellows and mounts. Long racks are a good choice for high mileage vehicles that have wear in the tie rod ends, and they save installation time. Short racks do not include the tie rods and bellows. Short racks cost less, but take more time to install because the tie rod ends also have to be installed.
FLUSHING THE STEERING SYSTEM
Once a rack has been removed from a vehicle, the power steering pump and lines must be flushed to remove all the old fluid. Skipping this important step will shorten the life of the replacement rack by circulating all the contaminants from the dirty fluid right back into the new rack.
NOTE: The Motorist Assurance Program now recommends changing the power steering fluid every 50,000 miles, or any time components such as the steering rack, pump or hoses are replaced.
Flushing can be accomplished by raising the front wheels off the ground and pouring fresh fluid through the pump reservoir allowing the fluid to drain out the return line. When the rack is back in the chassis, reconnect only the return line to the rack. Place the pressure line from the pump in a drain pan. Fill the pump reservoir with the correct type of power steering fluid required for the vehicle, then crank the engine over (after disabling the ignition by grounding the coil wire) or turn the pump by hand. Add two quarts of new PS fluid to the pump reservoir (be careful not to let the pump reservoir run dry), then reconnect the pressure line to the pump.
When installing the pressure lines on the rack, extreme care must be taken not to overtighten the fittings. Ford, for example, calls for only 10 ft. lbs. of torque on some racks, and 15 ft. lbs. on others. Some lines are designed to swivel after they have been tightened to provide flexibility during installation and to accommodate engine vibration. Overtightening the line fittings can strip the soft aluminum threads in the rack and damage housing.

Following the flushing procedure, the system has to be purged of air. This is done by starting the engine, allowing the power steering fluid to warm up, then slowly turning the steering wheel from side to side six to 10 times (do not turn too rapidly, hold at either locked position or allow the pump reservoir to run dry). If the fluid appears tan, light red, foamy or cloudy, continue purging until the fluid clears. Make sure the fluid reservoir is full when you have finished.
Anther trick that can be used to purge trapped air from a rack is to raise up one side of the vehicle with a floor jack, then the other while cycling the steering back and forth. Tilting the vehicle sideways causes the air inside the rack to rise toward the end of the rack where it can find its way out.
On some systems, the use of a power steering pump air evacuator (Devac tool) is required to purge the air from the system. The tool applies vacuum to the pump reservoir to draw out air.
Realignment of the toe setting will be necessary after replacing a rack, inner sockets or outer tie rod ends, so make sure the small outer clamp on the rack bellows has been tightened after the wheels have been realigned.
STEERING RACK INSTALLATION TIPS
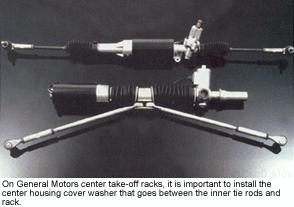
If you are replacing a General Motors center take-off rack, make sure the center housing cover washer goes between the inner tie rods and rack. If this washer is omitted or installed on top of the tie rods, the tie rod bolts will extend too far through the rack and contact the inside of the rack housing. This can cause binding, poor steering return or even crack the rack housing.
Some GM "C" body cars (Oldsmobile 98, Buick Park Avenue, Cadillac DeVille & Fleetwood) and "H" body cars (Pontiac Bonneville, Oldsmobile 88, Buick LeSabre) built between 1986 and 1994 may be equipped with one of three different steering gears: standard ratio, low ratio or variable ratio. Most people want the same steering feel as before, so make sure you get the correct replacement rack for your car.
The GM variable ratio racks can be identified by letters stamped into the pinion dust cover, by inspecting the teeth on the rack itself, or by counting how many turns of the steering wheel it takes to go from lock-to-lock. Racks with standard gears typically have three plus turns lock-to-lock, while those with a low ratio gear will usually be less than three turns lock-to-lock. The ratio for a variable rack can vary, so pull back one of the bellow, turn the rack as far as it will go to one side and examine the teeth on the rack. If the teeth are uniformly spaced and close together, it is a standard or low ratio rack. But if the distance between the teeth changes, it is a variable-ratio rack.
Something else to check when replacing a rack is the steering input shaft coupling. A coupling donut that is deteriorating with age poses a serious safety hazard, so be sure to replace it if it is not in perfect condition. Metal swivel couplings also need to be checked for rust and/or binding. The ones that are not protected from the elements by a plastic sleeve are usually the ones that have to be replaced.
If you are replacing a rack on an air bag-equipped vehicle, do not rotate the steering wheel while the rack is disconnected. Center the wheel before you disconnect the old rack. The clockspring forms the electrical connection between the air bag module in the steering wheel and the rest of the air bag system. If the steering is not centered when the rack is installed, it is possible to overextend and break the clockspring when the steering is turned all the way to one side or the other. A broken clockspring would prevent the air bag from deploying in an accident, and would also cause the air bag warning light to come on.
Also check the condition and tension of the pump drive belt. Check for conditions such as glazing, cracks, fraying or oil contamination. If the belt is worn, replace it. If the belt is more than four or five years old, recommend a new one.
Finally, check the upper strut mounts. If worn, corroded or damaged, they can bind and interfere with proper steering return. To check the strut mounts, turn each wheel side-to-side while the tie rod ends are disconnected from the steering arms. Any binding or stiffness calls for new mounts.
Adapted from an article written by Larry Carley for Brake & Front End magazine
Back to Steering Suspension Tire | Back to Info Main Page
Total messages: 0
